Difference between revisions of "Oracle 12c (12.1) Standalone Database Installation on Oracle Linux 6"
Jump to navigation
Jump to search
| (7 intermediate revisions by the same user not shown) | |||
| Line 1: | Line 1: | ||
* Download the installation files from http://www.oracle.com/technetwork/database/enterprise-edition/downloads/index.html | * Download the installation files from http://www.oracle.com/technetwork/database/enterprise-edition/downloads/index.html | ||
| − | * Click Next. | + | * Click '''Next'''. |
https://lh6.googleusercontent.com/-vVWyGjnx2Tg/Uc9uOj5cAiI/AAAAAAAAXdQ/7MB_K5d2sSk/s600/12c_1.png | https://lh6.googleusercontent.com/-vVWyGjnx2Tg/Uc9uOj5cAiI/AAAAAAAAXdQ/7MB_K5d2sSk/s600/12c_1.png | ||
| − | * | + | * Choose '''Skip software update''' then click '''Next'''. |
https://lh3.googleusercontent.com/-l1bzZyJBJCo/Uc9uQjGRAZI/AAAAAAAAXek/QcWBTHKlGA8/s600/12c_2.png | https://lh3.googleusercontent.com/-l1bzZyJBJCo/Uc9uQjGRAZI/AAAAAAAAXek/QcWBTHKlGA8/s600/12c_2.png | ||
| + | |||
| + | * Choose '''Create and configure a database'''. | ||
| + | https://lh4.googleusercontent.com/-zgzKnVW1hiE/Uc9uSTH_PiI/AAAAAAAAXfE/e-aH4dqnAQY/s600/12c_3.png | ||
| + | |||
| + | * Choose '''Server class'''. | ||
| + | https://lh4.googleusercontent.com/-VsNVz247IeM/Uc9uS4_JHkI/AAAAAAAAXfM/2_QYLZqJ1IE/s600/12c_4.png | ||
| + | |||
| + | * Choose '''Single instance database installation'''. | ||
| + | https://lh4.googleusercontent.com/-xY2Rx7a-X0Y/Uc9uTNLgFcI/AAAAAAAAXfU/HqEIdyvSD1Q/s600/12c_5.png | ||
| + | |||
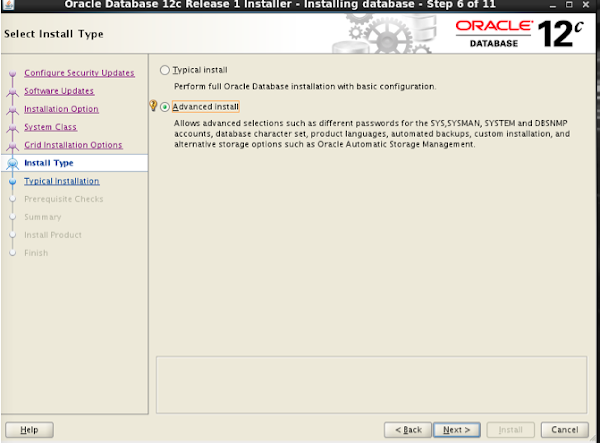
| + | * Choose '''Advanced install'''. | ||
| + | https://lh4.googleusercontent.com/-B8eZ2P3Hoiw/Uc9uTaOXKgI/AAAAAAAAXfc/pWp83wdnnZY/s600/12c_6.png | ||
| + | |||
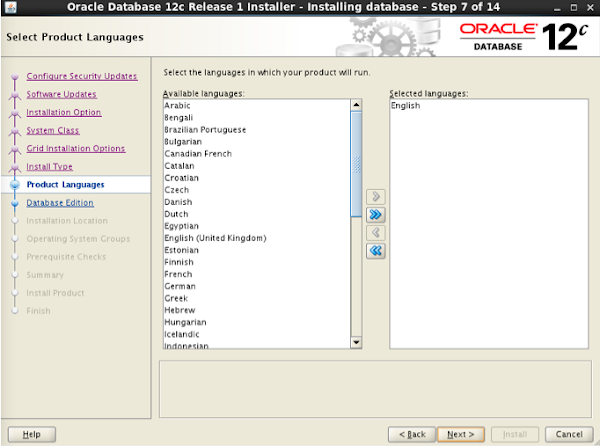
| + | * Choose appropriate language. | ||
| + | https://lh6.googleusercontent.com/-JAKBwHZ_PX8/Uc9uTjNkFTI/AAAAAAAAXfk/OS0bOUyRqrU/s600/12c_7.png | ||
| + | |||
| + | * Choose '''Enterprise Edition'''. | ||
| + | https://lh5.googleusercontent.com/-5eyZpo2Rz6A/Uc9uT3-mc8I/AAAAAAAAXfs/igrFlYGetoM/s600/12c_8.png | ||
| + | |||
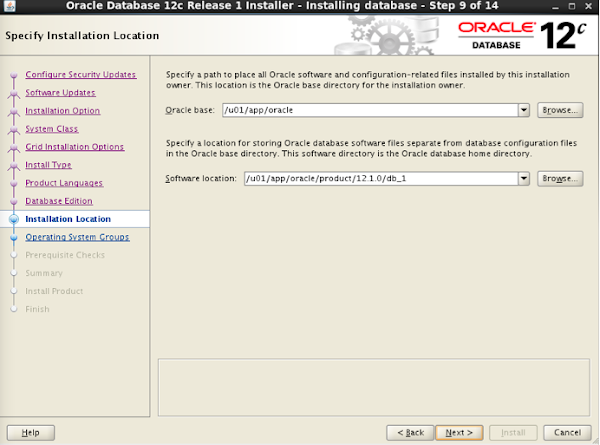
| + | * Specify installation locations. | ||
| + | https://lh5.googleusercontent.com/-IgiLvP2QcB4/Uc9uUAnBHPI/AAAAAAAAXf0/F-gzdVTtWQo/s600/12c_9.png | ||
| + | |||
| + | * If this is the first time, you will get prompted for the '''Inventory''' information. | ||
| + | https://lh5.googleusercontent.com/-H3OnjLvUlmA/Uc9uOn6vi0I/AAAAAAAAXdU/ETDtSpSEifQ/s600/12c_10.png | ||
| + | |||
| + | * Choose the type of database. | ||
| + | https://lh5.googleusercontent.com/-aLYENRqrLOA/Uc9uO_YSxYI/AAAAAAAAXdc/YETuYy6wsC4/s600/12c_11.png | ||
| + | |||
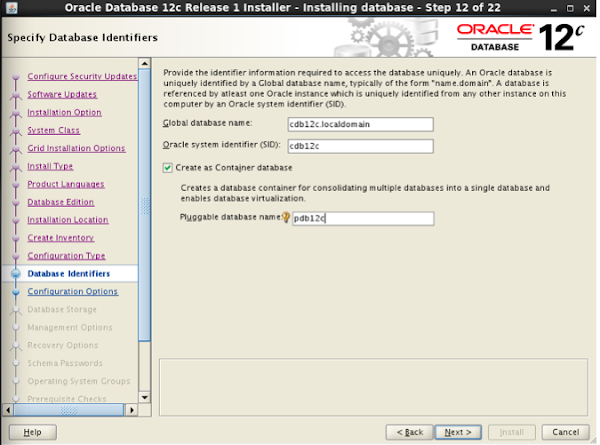
| + | * Specify the name of the database name and container database name. | ||
| + | https://lh6.googleusercontent.com/-Ie1Cf12-Buk/Uc9uPD8ad1I/AAAAAAAAXdw/yEw3gFDVWNY/s600/12c_12.png | ||
| + | |||
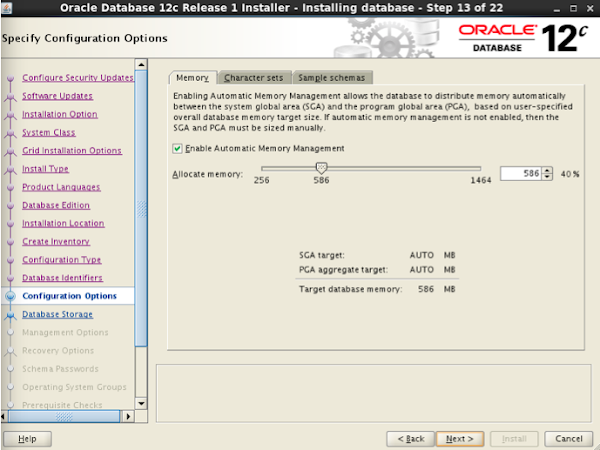
| + | * Specify the amount of memory allocation, character sets, and whether or not to install the sample schemas. | ||
| + | https://lh3.googleusercontent.com/-v0Tckld2P78/Uc9uPVNi8eI/AAAAAAAAXdo/scdeVcvqyeA/s600/12c_13.png | ||
| + | |||
| + | * Specify the location of database storage. | ||
| + | https://lh6.googleusercontent.com/-zgn2rTDz_iY/Uc9uPgREtFI/AAAAAAAAXds/8z3nQPQZOX0/s600/12c_14.png | ||
| + | |||
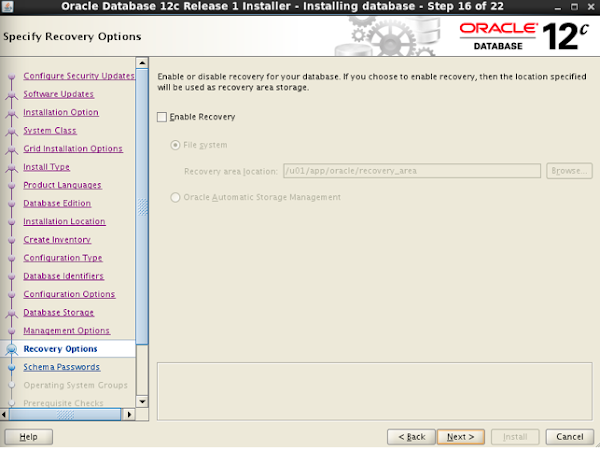
| + | * Choose whether or not to enable recovery. | ||
| + | https://lh6.googleusercontent.com/-ls3UEXjqR_Y/Uc9uP7FnzEI/AAAAAAAAXeI/ELkhWJcPBf0/s600/12c_16.png | ||
| + | |||
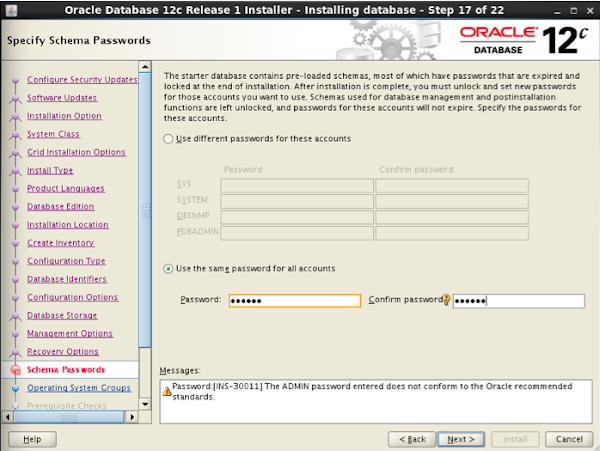
| + | * Specify the schema passwords. | ||
| + | https://lh3.googleusercontent.com/-SqVSwun7IME/Uc9uQPUreSI/AAAAAAAAXeA/v0k4Oh7fy1I/s600/12c_17.png | ||
| + | |||
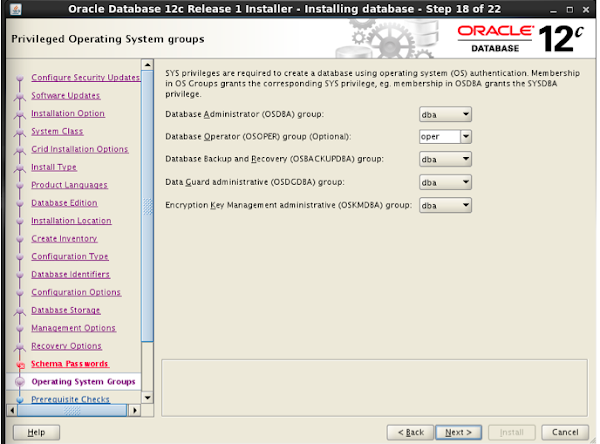
| + | * Specify appropriate OS groups. | ||
| + | https://lh6.googleusercontent.com/-kX3FmHYZsX8/Uc9uQF8yPQI/AAAAAAAAXeE/6vl2-akNPOk/s600/12c_18.png | ||
| + | |||
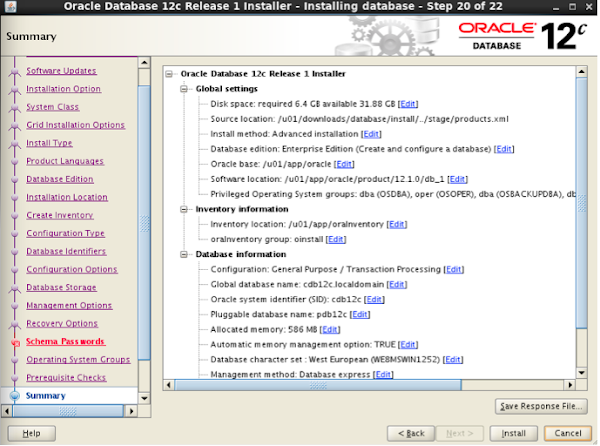
| + | * If needed, review all selections. Click '''Install''' to proceed with the installation. | ||
| + | https://lh6.googleusercontent.com/-UCH_6mWAjCM/Uc9uQz8ju0I/AAAAAAAAXec/SQvNFiMn-ps/s600/12c_20.png | ||
| + | |||
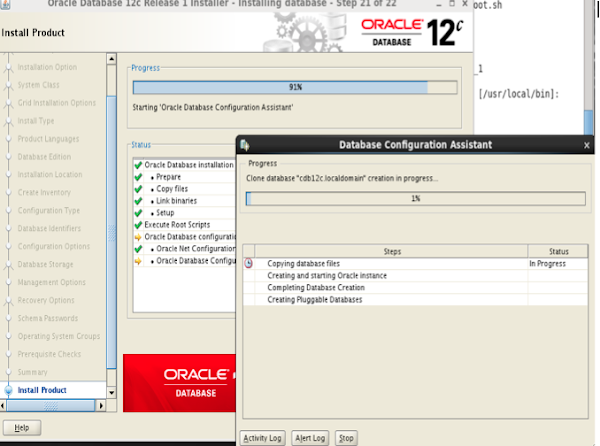
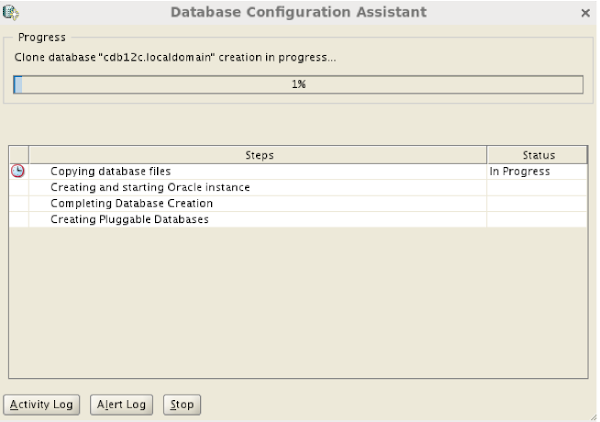
| + | * Progress | ||
| + | https://lh3.googleusercontent.com/-4ymn1TtozBU/Uc9uRHAXzCI/AAAAAAAAXeY/2j_V6f3Yjwk/s600/12c_21.png | ||
| + | |||
| + | https://lh5.googleusercontent.com/-SP7mkwVTH_s/Uc9uRtUTNII/AAAAAAAAXgA/Ep6IoPykeFo/s600/12c_21b.png | ||
| + | |||
| + | https://lh4.googleusercontent.com/-2ZtaQD0T48o/Uc9uRsI2nuI/AAAAAAAAXes/RaGXJgSrSrs/s600/12c_21c.png | ||
| + | |||
| + | * Completed | ||
| + | https://lh3.googleusercontent.com/-N2Pk_Qq_TSY/Uc9uR80QIgI/AAAAAAAAXe0/DNBrt4vSRAg/s600/12c_21d.png | ||
| + | |||
| + | https://lh6.googleusercontent.com/-hz8CGlbxc0Y/Uc9uSCcWJ6I/AAAAAAAAXe8/Evw_LzOUu44/s600/12c_22.png | ||
| + | |||
| + | * Log on to Enterprise Manager. | ||
| + | https://lh4.googleusercontent.com/-ja5Wss_jZS0/Uc9uUdm7DiI/AAAAAAAAXf8/YkZS8JOyKUs/s600/12c_em_db.png | ||
| + | |||
| + | [[Category:Oracle Database]] | ||
| + | [[Category:Oracle 12c]] | ||
| + | [[Category:12c]] | ||
| + | [[Category:Oracle Installation]] | ||
Latest revision as of 21:49, 29 June 2013
- Download the installation files from http://www.oracle.com/technetwork/database/enterprise-edition/downloads/index.html
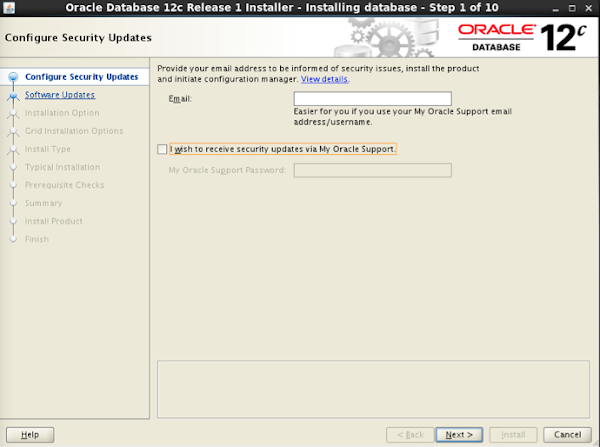
- Click Next.
- Choose Skip software update then click Next.

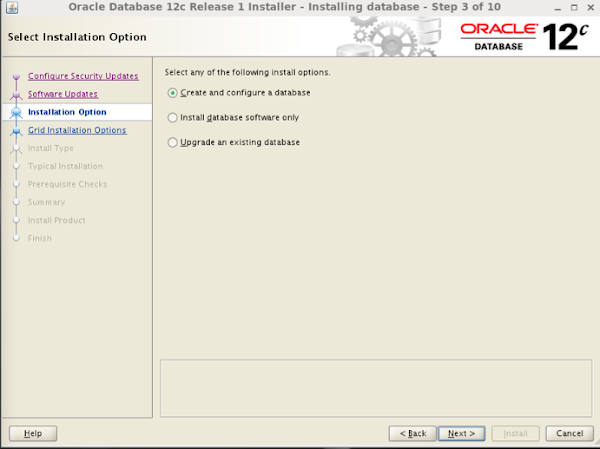
- Choose Create and configure a database.
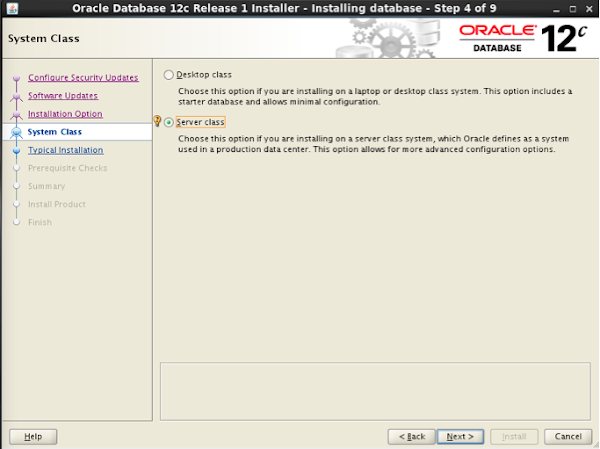
- Choose Server class.
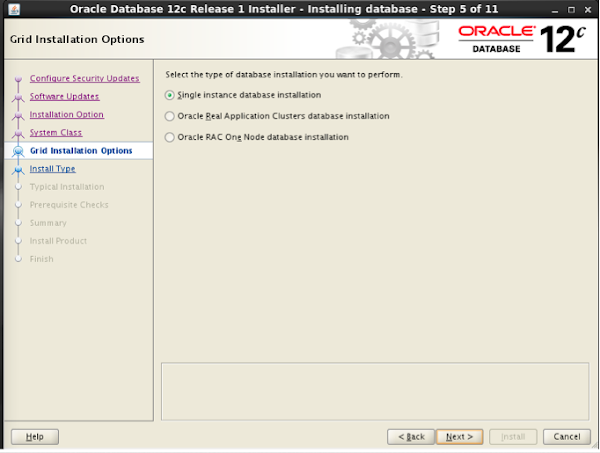
- Choose Single instance database installation.
- Choose Advanced install.
- Choose appropriate language.
- Choose Enterprise Edition.

- Specify installation locations.
- If this is the first time, you will get prompted for the Inventory information.

- Choose the type of database.

- Specify the name of the database name and container database name.
- Specify the amount of memory allocation, character sets, and whether or not to install the sample schemas.
- Specify the location of database storage.

- Choose whether or not to enable recovery.
- Specify the schema passwords.
- Specify appropriate OS groups.
- If needed, review all selections. Click Install to proceed with the installation.
- Progress

- Completed


- Log on to Enterprise Manager.
